Raspberry Pi — DHT11
Підключимо датчик температури та вологості DHT11 до Raspberry Pi. Я раніше писав про популярний датчик вологості і температури DHT11 у статті DHT11 — цифровой датчик температуры и влажности Документація по DHT11: DHT11.pdf, DHT11_a.pdf.
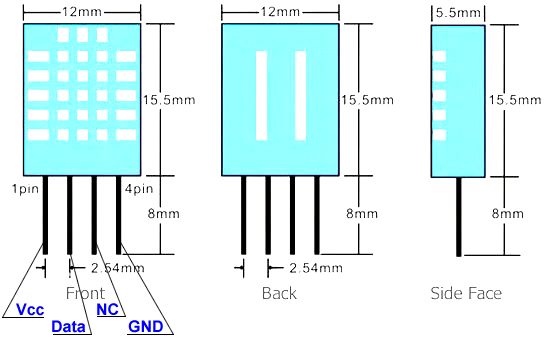
Розміри та розпіновка DHT11:
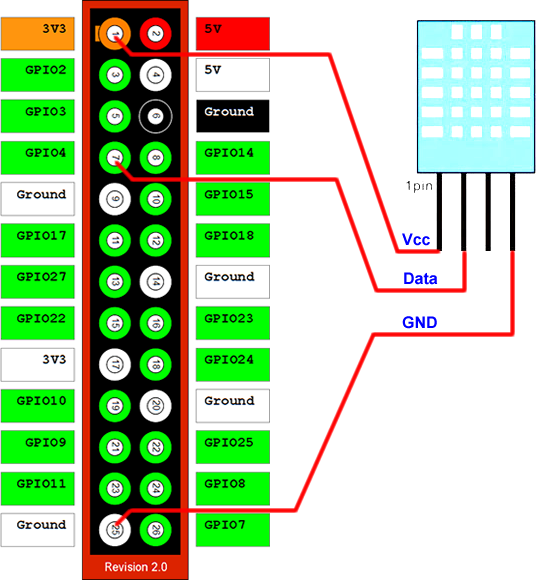
Підключимо датчик до Raspberry Pi, як вказано на схемі.

Почнемо з прикладу на С. Створимо файл dht11.c:
#include <wiringPi.h>

#include <stdio.h>
#include <stdlib.h>
#include <stdint.h>
#define MAXTIMINGS	85
#define DHTPIN		7
int dht11_dat[5] = { 0, 0, 0, 0, 0 };

void read_dht11_dat()
{
	uint8_t laststate	= HIGH;
	uint8_t counter		= 0;
	uint8_t j		= 0, i;
	float	f; /* fahrenheit */

	dht11_dat[0] = dht11_dat[1] = dht11_dat[2] = dht11_dat[3] = dht11_dat[4] = 0;

	/* pull pin down for 18 milliseconds */
	pinMode( DHTPIN, OUTPUT );
	digitalWrite( DHTPIN, LOW );
	delay( 18 );
	/* then pull it up for 40 microseconds */
	digitalWrite( DHTPIN, HIGH );
	delayMicroseconds( 40 );
	/* prepare to read the pin */
	pinMode( DHTPIN, INPUT );

	/* detect change and read data */
	for ( i = 0; i < MAXTIMINGS; i++ )
	{
		counter = 0;
		while ( digitalRead( DHTPIN ) == laststate )
		{
			counter++;
			delayMicroseconds( 1 );
			if ( counter == 255 )
			{
				break;
			}
		}
		laststate = digitalRead( DHTPIN );

		if ( counter == 255 )
			break;

		/* ignore first 3 transitions */
		if ( (i >= 4) && (i % 2 == 0) )
		{
			/* shove each bit into the storage bytes */
			dht11_dat[j / 8] <<= 1;
			if ( counter > 16 )
				dht11_dat[j / 8] |= 1;
			j++;
		}
	}

	/*
	 * check we read 40 bits (8bit x 5 ) + verify checksum in the last byte
	 * print it out if data is good
	 */
	if ( (j >= 40) &&
	     (dht11_dat[4] == ( (dht11_dat[0] + dht11_dat[1] + dht11_dat[2] + dht11_dat[3]) & 0xFF) ) )
	{
		f = dht11_dat[2] * 9. / 5. + 32;
		printf( "Humidity = %d.%d %% Temperature = %d.%d *C (%.1f *F)",
			dht11_dat[0], dht11_dat[1], dht11_dat[2], dht11_dat[3], f );
	}else  {
		printf( "Data not good, skip" );
	}
}

int main( void )
{
	printf( "Raspberry Pi wiringPi DHT11 Temperature test program" );

	if ( wiringPiSetup() == -1 )
		exit( 1 );

	while ( 1 )
	{
		read_dht11_dat();
		delay( 1000 ); /* wait 1sec to refresh */
	}

	return(0);
}
У цій програмі використовується бібліотека wiringPi. Ми її встановлювали у попередній статті Raspberry Pi — PWM і Сервопривод. Якщо wiringPi ще не встановлено, це робиться наступним чином:
sudo apt-get install git-core
git clone git://git.drogon.net/wiringPi
cd wiringPi
./build
cd ..
Cкомпілюємо dht11.c:
gcc dht11.c -o dht11 -lwiringPi
Запустимо програму:
./dht11
На екрані маємо побачити наступне:
Raspberry Pi wiringPi DHT11 Temperature test program
Humidity = 33.0 % Temperature = 27.0 *C (80.6 *F)
Humidity = 33.0 % Temperature = 27.0 *C (80.6 *F)
Data not good, skip
Data not good, skip
Humidity = 33.0 % Temperature = 27.0 *C (80.6 *F)
Humidity = 33.0 % Temperature = 27.0 *C (80.6 *F)
Data not good, skip
Humidity = 33.0 % Temperature = 27.0 *C (80.6 *F)
Humidity = 33.0 % Temperature = 27.0 *C (80.6 *F)
Humidity = 33.0 % Temperature = 27.0 *C (80.6 *F)
Humidity = 33.0 % Temperature = 27.0 *C (80.6 *F)
Humidity = 33.0 % Temperature = 27.0 *C (80.6 *F)
Humidity = 33.0 % Temperature = 27.0 *C (80.6 *F)
Тепер спробуємо приклад на Python. Створімо файл dht11.py:
import RPi.GPIO as GPIO
import time

def bin2dec(string_num):
    return str(int(string_num, 2))

data = []

GPIO.setmode(GPIO.BCM)

GPIO.setup(4,GPIO.OUT)
GPIO.output(4,GPIO.HIGH)
time.sleep(0.025)
GPIO.output(4,GPIO.LOW)
time.sleep(0.02)

GPIO.setup(4, GPIO.IN, pull_up_down=GPIO.PUD_UP)

for i in range(0,500):
    data.append(GPIO.input(4))

bit_count = 0
tmp = 0
count = 0
HumidityBit = ""
TemperatureBit = ""
crc = ""

try:
        while data[count] == 1:
                tmp = 1
                count = count + 1

        for i in range(0, 32):
                bit_count = 0

                while data[count] == 0:
                        tmp = 1
                        count = count + 1

                while data[count] == 1:
                        bit_count = bit_count + 1
                        count = count + 1

                if bit_count > 3:
                        if i>=0 and i<8:
                                HumidityBit = HumidityBit + "1"
                        if i>=16 and i<24:
                                TemperatureBit = TemperatureBit + "1"
                else:
                        if i>=0 and i<8:
                                HumidityBit = HumidityBit + "0"
                        if i>=16 and i<24:
                                TemperatureBit = TemperatureBit + "0"

except:
        print "ERR_RANGE"
        exit(0)

try:
        for i in range(0, 8):
                bit_count = 0

                while data[count] == 0:
                        tmp = 1
                        count = count + 1

                while data[count] == 1:
                        bit_count = bit_count + 1
                        count = count + 1

                if bit_count > 3:
                        crc = crc + "1"
                else:
                        crc = crc + "0"
except:
        print "ERR_RANGE"
        exit(0)

Humidity = bin2dec(HumidityBit)
Temperature = bin2dec(TemperatureBit)

if int(Humidity) + int(Temperature) - int(bin2dec(crc)) == 0:
        print "Humidity:"+ Humidity +"%"
        print "Temperature:"+ Temperature +"C"
else:
        print "ERR_CRC"
Запустимо його:
python ./dht11.py
Повинні побачити наступне:
Humidity:33%
Temperature:27C
Але інколи скрипт видає:
ERR_RANGEЯкщо ви звернули увагу приклад на С теж мав проблеми і не завжди міг чітко зчитувати дані. Я довго колупався з цією проблемою і намагався хоч якось її вирішити. Виявилося, що Raspberry Pi ...не працює в режимі реального часу! Тобто, програмні затримки не завжди точні. Це призводить до помилок при зчитуванні даних. Я не знайшов іншого шляху (він мені не подобається, але він працює), як написати скрипта, який намагається зчитувати дані з датчика до першої вдалої спроби. Кількість спроб обмежена 10.
Текст скрипта dht11_read.py:
# This script try to read from DHT11 10 times
# Return first correct result
# Note This script is a way to fix bug of reading from DHT11
import subprocess
counter = 0

while (counter < 10 ):
	result = subprocess.Popen("python /root/scripts/dht11.py", shell = True, stdout = subprocess.PIPE).communicate()[0]
	if (result == "32"):
		print result
		exit(1)
	counter +=1
Успіхів.
Дивись також:
- Raspberry Pi — що це таке?
- Raspberry Pi — GPIO
- Raspberry Pi — UART
- Raspberry Pi — FT232
- Raspberry Pi — PWM і Сервопривод
- Raspberry Pi — DHT11
- Raspberry Pi - FM Transmitter
- Прошивка AVR мікроконтролерів за допомогою Raspberry Pi
- Raspberry Pi — LCD display 1602
- Raspberry Pi — WiFi
- Raspberry-Pi — I2C (TWI)
- Raspberry Pi - DS18B20
- Raspberry Pi Camera
- nRF24L01+ ATMEGA + Raspberry Pi
- BMP180 + Raspberry Pi + WH1602
- Wi-Fi Метео станція
- Raspbian. Apache + PHP + Python + MySQL
- Встановлюємо Raspbian на Raspberry Pi без клавіатури та монітору
- IR-дистанційне керування. Використання LIRC у Python
- Raspberry Pi. Raspbian. Відправлення пошти через аккаунт Gmail
- Neoway M590 – GSM/GPRS modem
- MPU-6050 – гіроскоп – акселерометр
- HMC5883L Магнітометр
- PWM контролер з інтерфейсом I2С на базі мікросхеми PCA9685
- Метеостанція на Raspberry Pi своїми руками
- Raspberry Pi. Live-stream video
Tags
timer meteo pwm capture dma smd brushless sensors 3d-printer examples sms git st-link adc rfid exti web bme280 bmp280 gps options barometer battery lcd dht11 hih-4000 atmega dc-dc piezo solar bluetooth displays mpx4115a bldc websocket eb-500 motor raspberry-pi usb rtc usart max1674 avr soldering mongodb esp8266 programmator mpu-6050 remap rs-232 pmsm bkp gpio i2c eeprom encoder stm32 css docker flask nodemcu ssd1331 tim flash servo nvic ssd1306 mpu-9250 ethernet led foc python ngnix watchdog books html java-script wifi uart
Архіви